


v1.4 Official Documentation
Table of Contents
Introduction
VOXORex is a versatile tool made for Unity that can:
Voxelize any texture into a 3D mesh or group of meshes by extruding stacks of voxels. Two modes: Tiles / Free Size.
Voxelize any mesh, optionally baking a selected material’s colours to vertex colour. Please read further in for more information about mesh support.
Voxelize based on an ASCII text file in combination with a palette.
Utility script is included to produce said ASCII files from textures
Apply vertex colour using several techniques to any of the above.
Optimize meshes and animate vertex colours.
Many configuration settings are provided to produce near infinite varieties of results!
All you need to do is choose your source, have the script enabled in Play mode and you’ll get an accurately constructed and coloured model you can save from Play mode, and use any way you like!
You can make game-ready voxel style props and VOXORex has a special mode to easily make cube-style walls for your world building.
VOXORex meshes, upon construction, do not tend to be low poly, rather the opposite - since not only each voxel but each cube face is individually colourable, each visible face needs its own full set of 4 vertices. Optimization is now available through the VOXORex Mesh Optimizer:
VOXORex Mesh Optimizer utility is included, to eliminate unnecessary mesh triangles, letting you use even more VOXORex meshes in games and apps with efficient rendering!
You can include VOXORex scripts in your game or project to create meshes at run time that become part of your world, with no mesh files needed - just relatively much smaller textures!
VOXORex Colour Effects script is included. You can attach this script to a VOXORex mesh, and almost any mesh, and animate vertex colours in various ways at run time.
Notes
VOXORex is compatible with all versions of Unity from 5.x and up!
In versions 2017.3 or newer, mesh format UInt32 is ready and waiting for your impressive one-piece meshes with up to ~4.28 billion vertices.
Versions prior to 2017.3 do not support meshes with over 65536 (64k) vertices, but never fear:
In Texture Tiles mode, you can use smaller but more tiles to get the same look with UInt16-compliant meshes. You can also control the height in voxels as another way of affecting the number of vertices needed in your output.
In Texture Free Size, Mesh, and Data File modes, the output is automatically split into UInt16 meshes as needed.
VOXORex is compatible with all three Rendering Pipelines provided by Unity: Built-In, Universal \ Lightweight, and High Definition!
VOXORex includes 4 shaders for each Rendering Pipeline. The basic functionality is shared, with Opaque and Fade (transparent) versions, and Lit or Unlit versions of each. These shaders are very performant, with support for vertex colours and a texture, strength of each and optional texture-based emission for Lit versions. You can use these shaders however you see fit in your own projects too.
VOXORex includes the freely available MeshSaverEditor.cs script that you can find on Github, for your convenience. It allows you to right-click any Mesh Filter component in the hierarchy and save its mesh as an asset.
VOXORex works with any size image allowed in Unity - 1 pixel up to 8k, non square, NPOT, it has you covered. Your output won’t be distorted, it will have the same aspect ratio as your Source Texture.
VOXORex has a featured, intuitive Inspector layout and lots of super informative tooltips! You can find the details for each setting in this document.
HDRP and URP Extras Setup
As of version 1.2, HDRP and URP shaders and materials and kept in separate importable packages in the main VOXORex folder. These files, VOXORex_HDRPSetup.unitypackage and VOXORex_URPSetup.unitypackage, also include new scenes for the examples, with light and camera setups that are intended to be better for those rendering pipelines.
Note that while it is convenient to use these shaders and scenes, they are not required for VOXORex to work. You can use VOXORex in your own scenes or from scripts, and specify which materials should be shown on the output.
3) Choose any texture and tick “Read/Write Enabled” in the Import Settings. If your texture has any partially to fully transparent areas, also tick “Alpha Is Transparency”.

4) Configure the VOXORex script to use your texture by selecting it in the Source Texture parameter. It is optional to change Tile Size or other settings.

5) Change other settings as you desire, but defaults will work. Here I show how to override the colour of all South pointing faces with blue, and shade the entire output with a darker blue shadow coming from the South (screen bottom).

6) Press Play. As long as the GameObject and VOXORex script component are both enabled, VOXORex will run automatically and produce your output. (Protip: you can control when you want VOXORex scripts to run by enabling or disabling the script components or the GameObjects they are on.)

7) Your output is ready! Use the Scene View to fully control your viewing ability.

Quick Start Example for Meshes
The following pictorial guide represents typical minimum steps to follow to make a voxelized mesh out of another mesh with VOXORex.
1) Create an empty GameObject that will host the VOXORex script.

2) Add a VOXORex script component to the GameObject.

3) Configure the VOXORex script to use your mesh by selecting it in the Mesh Prefab parameter.

4) Set the Source Upscale value to how many voxels your output’s largest dimension should have (more voxels / area = more shape detail)

5) Choose a way to apply colour to the output, otherwise it will be all white.

6) Press Play. As long as the GameObject and VOXORex script component are both enabled, VOXORex will run automatically and produce your output. (Protip: you can control when you want VOXORex scripts to run by enabling or disabling the script components or the GameObjects they are on.)
7) Your output is ready! Use the Scene View to fully control your viewing ability.

Quick Start Example for Data Files
The following pictorial guide represents typical minimum steps to follow to make a voxelized mesh out of an ASCII text file in VOXORex’s format.
1) Create an empty GameObject that will host the VOXORex script.
2) Add a VOXORex script component to the GameObject.
3) Next you will need a data file. Make an ASCII text file. Format it as shown. A detailed explanation can be found in the main documentation. For now note that spaces will be empty output and non-spaces will be solid output.

4) Import the text file into your project and configure the VOXORex script to use your data file by entering the path in Source File Path. This path is relative to the Assets folder.

5) Choose a way to apply colour to the output, otherwise it will be all white.

6) Press Play. As long as the GameObject and VOXORex script component are both enabled, VOXORex will run automatically and produce your output. (Protip: you can control when you want VOXORex scripts to run by enabling or disabling the script components or the GameObjects they are on.)
7) Your output is ready! Use the Scene View to fully control your viewing ability.

Full Documentation: Settings
Voxel Source
This is what you want to voxelize. You can choose Texture, Data File, or Mesh. Your output will be constructed based on this, according to the settings detailed below. Changing this setting will update the Inspector to show settings related to that type of source.
Source Texture
Available when Voxel Source is Texture. This should be a texture asset in your project which has been imported with “Read/Write Enabled” ticked. If you have a texture with transparency and want VOXORex to use that, you must also import with the “Alpha Is Transparency” option ticked. You can disable “Generate Mip Maps” if you are not using this texture for other purposes, to save some file size.
If your Source Texture has a non-square aspect ratio, the voxels of the mesh will have exactly the same ratio, as will each tile. If that’s not what you want, you can get around it by using your image editor of choice and framing your image within a square transparent area.
Source File Path
Available when Voxel Source is Data File. This should be a relative file path based in your project's Assets folder. The referenced file should be an ASCII text file in the format detailed in the VOXORex Data File Format section.
Mesh Prefab
Available when Voxel Source is Mesh. This should be a prefab in your project or a GameObject in your Scene hierarchy (which could be an instance of a prefab, or not). There should be one or more meshes referred to by a MeshFilter somewhere in the prefab / GameObject. The meshes do not need to have “Read / Write Enabled” ticked in their Import Settings window.
Alpha Cutoff
Available when Voxel Source is Texture. Areas of the Source Texture where the transparency level (alpha) falls below this threshold will produce no voxels in your output. The screen shot below shows how the same texture used with a different Alpha Cutoff can produce different results.

Texture Mode
Available when Voxel Source is Texture. You can choose between Tiles and Free Size.
Tiles lets you decide how many rectangular to square tiles you would like to divide the output into, and a size per individual tile. Tile size and number choices are pre-set from a list of most of the powers of 2, up to a limit.
Free Size gives you a single tile / mesh (unless it has to be split into UInt16 meshes in versions of Unity prior to 2017.3). Free Size lets you specify exactly how many voxels wide and deep your output should be, with the Vertical Tiers setting giving you control over voxels high. You can choose any size in width and depth from 1 to 4096.

Output Width / Depth
Available when Voxel Source is Texture and Texture Mode is Free Size. This is how many voxels in width and depth your output will be, not accounting for transparency in the Source Texture (or Shape Texture if a Shape texture is being used).

Output Tiles
Available when Voxel Source is Texture and Texture Mode is Tiles. Your output will consist of at least one tile. Each tile is a mesh. You can choose 1x1 (1 tile) up to 128x128 (16384 tiles) stepping up by powers of 2. Totally transparent tiles will not produce a mesh. In versions of Unity prior to 2017.3, tiles that would exceed the 64k vertex limit will not produce a mesh. Tiles have the same aspect ratio as the Source Texture. There are always the same number of tiles wide and deep. A larger number of tiles will increase the amount of voxels used to construct the output, thus accessing and visualizing greater detail in your Source Texture. All tiles will be correctly arranged within a parent Game Object, so you have a handy reference for their relative positions.

Tile Size
Available when Voxel Source is Texture and Texture Mode is Tiles. This is how many voxels in width and depth each tile is made of. Each voxel stack's height is algorithmically determined by the Height Based On setting and related settings in the Voxel Settings group. Available options are powers of 2 from 1 to 1024. The larger your tile size, the number of voxels, and thus mesh vertices, increases exponentially. The two sides of the example below are both 1 tile, but the one on the right looks less blocky than the one on the left. Choose appropriately depending on the style you are going for.

Important Note about Output Tiles and Tile Size
VOXORex is usually done voxelizing a texture in times of less than a second to a few seconds, but note that more Output Tiles and larger Tile Sizes do add to the time it takes, and use more system memory after finishing, while rendering the meshes. The limits are meant to be generous enough so as not to restrict experimentation, but the time it takes depends on your system, so you can judge how far you should go by starting with fairly low settings and increase, using the speed of progress bars to assess how hard your system is working. A mesh with more vertices takes more storage and memory, and for meshes with vertex colour attribute, an additional 4 floating point numbers are stored for every vertex. A mesh with a million vertices and colours, which you can certainly exceed by far in VOXORex, is not a small file. So if you are going for game-usable assets that won’t break your poly count and bloat your file size, keep it in mind. If you are going for mind-blowing bespoke art, crank it up if your system can take it. VOXORex logs to the console about the number of vertices and triangles per mesh it creates, for your reference.
Internal Faces
Available when Voxel Source is Mesh. This is how you want to deal with voxel faces that are not visible from the outside of the mesh.
Nothing: Eliminate them, resulting in nothing inside. This means less vertices & triangles required to achieve the same outward appearance, but adds more processing time with increasing Source Upscale.
Shell: Keep them, resulting in voxels having inner & outer cube faces as if the mesh were a shell. Note that this includes voxels for any internal geometry that is part of the Source Mesh. This option is faster to create but results in more vertices & triangles. It may have useful or interesting applications depending on your needs.

Source Upscale
Available when Voxel Source is Mesh. This is how many voxels in its largest dimension the output should be, gaining more shape detail with higher value. Other dimensions will be in correct proportion. Higher values increase the number of mesh vertices and triangles, and processing time.

Height Based On
Available when Voxel Source is Texture. This is how each voxel stack's height is determined from the Source Texture. You may choose from Hue, Lightness, Saturation, Alpha, Red, Green, or Blue. Each part of your Source Texture corresponding to each voxel stack will have that attribute of its colour analysed out of the range [0, 1] (except: see Normalize Height Input and Clamp Height Input) to determine voxel stack height for any given X, Z. For your chosen Vertical Tiers value, a voxel stack will reach that many voxels high if its height basis value is equal to maximum. If you choose 24 Vertical Tiers and Height Based On Lightness, a voxel stack will be 24 voxels high if it corresponds to a point in the Source Texture that is at maximum Lightness. A voxel stack would be 1 voxel high if it corresponds to minimum Lightness. Voxel stacks are at least 1 high unless the Source Texture or Shape Texture is under its Alpha Cutoff at that corresponding point.

Invert Height Input
Available when Voxel Source is Texture. See Height Based On. This will switch low areas with high, i.e. a voxel stack corresponding to maximum height basis would be 1 high.

Invert Voxel Data
Available when Voxel Source is Data File or Mesh. This will convert what would become voxels to empty space, and vice versa. If Voxel Source is Mesh, this will result in a mold-like box with an internal cavity in the shape of the voxelized mesh. If Voxel Source is Mesh and Internal Faces is Shell, you’ll get a thin empty inverse shell-like space inside a mostly solid block. If Voxel Source is Data File, you’ll get the opposite of what’s in the file. The example shown is from a Data File.
Note that choosing to invert voxel data no longer allows you to colour by a material.

Normalize Height Input
Available when Voxel Source is Texture. See Height Based On. This will set the compared minimum and maximum height basis values to the least and most found in the Source Texture, rather than [0, 1]. In most cases this will magnify the differences in height present.

Clamp Height Input / Histogram
Available when Voxel Source is Texture. See Height Based On. This will set the compared minimum and maximum height basis values to the specified values using the range slider provided, rather than [0, 1]. This disregards any areas of the Source Texture where the height basis value is outside the range, turning them into cutouts. This restricted range will still be mapped proportionally to the full available height specified by Vertical Tiers.
You can use the histogram displayed below the slider to analyse the image data and decide where you want the range. Height input values are sorted into bins that are 10% wide. You can click the histogram for a larger windowed view where you can also see how many pixels per bin there are. You cannot change the histogram - rather, it will be immediately reverted to correct data.

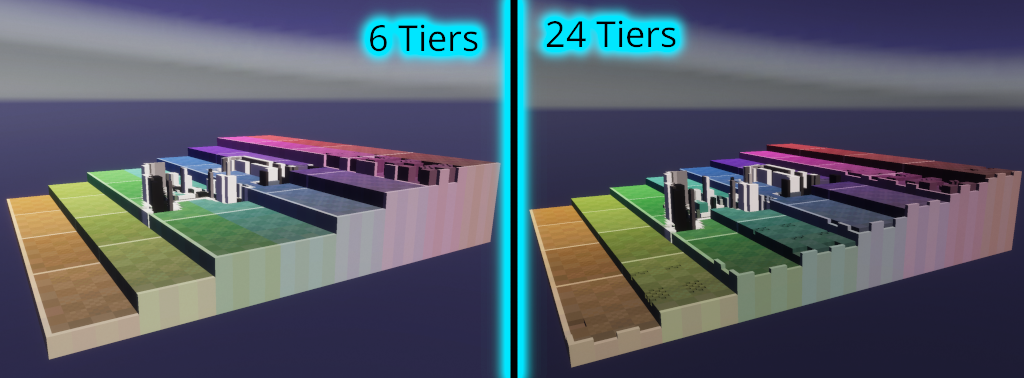
Vertical Tiers
Available when Voxel Source is Texture. This is how many voxels high the areas corresponding to the maximum height basis values in the Source Texture will be. Other voxel stacks are equally proportional to their height basis. This allows you to control the vertical voxel resolution by using more Vertical Tiers per the same world height, as shown in the example below. More Vertical Tiers will increase the number of mesh vertices.
Shape Stencil
Available when Voxel Source is Texture. This tells VOXORex how to determine the shape of your output, i.e., which voxel stacks are allowed to have some voxels, based on their location in the XZ plane and the relevant Alpha Cutoff (there could be up to 2 Alpha Cutoffs being applied depending on your settings). Set to Source Texture, the Source Texture’s transparency alone will determine the shape. Set to Shape Texture, you can select another texture that will also control the shape in combination with the Source Texture.
Shape Texture
Available when Voxel Source is Texture and Shape Stencil is Shape Texture. This image will be applied as a stencil, i.e., transparent areas defined by this image will not appear in the output. This should be a texture asset in your project which has been imported with “Read/Write Enabled” enabled. If you have an image with transparency and want VOXORex to use that, you must also import with the “Alpha Is Transparency” option ticked. If you do not use transparency in the Shape Texture, it will solidify the entire area. You can disable “Generate Mip Maps” if you are not using this texture for other purposes, to save some file size. The Shape Texture can be any size. It will be stretched to fit the Source Texture before the effect is applied.

Invert Shape Cutout
Available when Voxel Source is Texture and Shape Stencil is Shape Texture. When inverted, non-transparent areas defined by the Shape Texture will not appear in the output.

Shape Alpha Cutoff
Available when Voxel Source is Texture and Shape Stencil is Shape Texture. Areas of the Shape Texture where the transparency level (alpha) falls below this threshold will produce no voxels in your output.

Mesh Format
Available when Voxel Source is Data File or Mesh. In versions of Unity from 2017.3 and up, both 16- and 32-bit unsigned integer formats are provided for storing mesh data. With 16-bit format, mesh vertices are limited to 65,536. With 32-bit format, meshes can have up to ~4.28 billion vertices. In supported versions, you can see and change this setting. If you choose 16-bit, your output will be automatically split into smaller meshes as necessary to stay within the limit. If you choose 32-bit, your output will be a single mesh.
Vertex Colour Based On: Height
If Voxel Source is Texture, apply a colour to each vertex according to its relative Y position out the the number of Vertical Tiers. For Meshes and Data Files, apply the colour relative to the total height of the output.


Vertex Colour Based On: Width
Apply a colour to each vertex according to its relative X position out of the total width of the output.


Vertex Colour Based On: Depth
Apply a colour to each vertex according to its relative Z position out of the total depth of the output.


Vertex Colour Based On: Palette
Available when Voxel Source is Data File. Each entire voxel you represent in the data file with a character will be the colour of the palette entry for that character, in a palette you specify. See VOXORex Palette.

Vertex Colour Based On: Height /Width / Depth Plus Palette
Available when Voxel Source is Data File. Positional and palette colours will both be applied, in a given blend strength. If you have a Clear colour (black, with alpha = 0) in your palette, voxels assigned to that colour won’t have any palette colour but they will show the full positional colour. See Palette Strength.

Vertex Colour Based On: Source Texture Per Face
Available when Voxel Source is Texture. Each voxel stack will be a single, solid colour, according to its corresponding position in the Source Texture. This results in a quite accurate yet more pixelated / cube-constructed look. Will not have any blurring when viewed close-up.

Vertex Colour Based On: Source Texture Per Vertex
Available when Voxel Source is Texture. Each vertex stack will be a single, solid colour, according to its corresponding position in the Source Texture. This results in an even more accurate and precisely painted look since colours can blend across faces. Could look blurry when viewed close-up, especially for smaller meshes.

Vertex Colour Based On: Albedo Texture Per Face
Available when Voxel Source is Texture. Each voxel stack will be a single, solid colour, according to its corresponding position in a specified Albedo Texture. This results in a quite accurate yet more pixelated / cube-constructed look. Will not have any blurring when viewed close-up.

Vertex Colour Based On: Albedo Texture Per Vertex
Available when Voxel Source is Texture. Each vertex stack will be a single, solid colour, according to its corresponding position in a specified Albedo Texture. This results in an even more accurate and precisely painted look since colours can blend across faces. Could look blurry when viewed close-up, especially for smaller meshes.

Vertex Colour Based On: Materials
Available when Voxel Source is Mesh and Invert Voxel Data is not selected. Apply a colour to each voxel, taken from a material, sampled at the texture coordinates nearest to that voxel’s location on the original mesh. Therefore, the voxelized mesh has the same colouring as the original mesh, but in voxel form. You can apply the same material(s) the original mesh uses, or choose any you prefer.

Gradient Source
Available when Vertex Colour Based On is Height, Width, or Depth. You can choose Key to set up a gradient colour key in the Inspector, or Texture to read the colours from a specified texture. Gradient colours are applied from the start of the gradient at the least Height / Width / Depth, to the end of the gradient at the most Height / Width / Depth, with some options to change that.
Gradient Texture
Available when Vertex Colour Based On is Height, Width, or Depth and Gradient Source is Texture. Choose a texture in your project and the first column of pixels will be applied as a colour gradient, with the lowest Y pixel being the start of the gradient. This should be a texture asset in your project which has been imported with “Read/Write Enabled” enabled. You can disable “Generate Mip Maps” if you are not using this texture for other purposes, to save some file size. The Gradient Texture can be any size that is at least 1x2 pixels.

Height / Width / Depth Based Colours
Available when Vertex Colour Based On is Height, Width, or Depth and Gradient Source is Key. You can set up a standard gradient colour key. Alpha values will be ignored. These gradients are limited in Unity to 8 keys.

Gradient Multiplier
Available when Vertex Colour Based On is Height, Width, or Depth. Your gradient colours are by default applied once across the entire output, but you can increase it with the provided slider. Note that no matter the number you enter here, the output must have sufficient vertices for the entire gradient to appear. For example, If your Vertical Tiers is 10, there are 11 vertical points available for a colour to be applied. If your gradient Multiplier is 2 and it has 8 colours, it needs 16 points, so some colour shifting will result from picking 11 equal points. Also see Gradient Repeat Mode.

Invert Gradient
Available when Vertex Colour Based On is Height, Width, or Depth. Your gradient colours are by default applied from the start of the gradient at the least Height / Width / Depth, to the end of the gradient at the most Height / Width / Depth. When inverted, they are applied from the end of the gradient at the least Height / Width / Depth, to the start of the gradient at the most Height / Width / Depth.

Gradient Repeat Mode
Available when Vertex Colour Based On is Height, Width, or Depth. You can choose how the gradient will repeat when the Gradient Multiplier is greater than 1. Symmetric means that after it reaches the end colour, it will start from the end colour and go back toward the start colour, producing a smooth blend where the gradient ends and starts. Asymmetric means the colours will cycle back to start after every end, potentially producing a disjointed colouring effect.

Albedo Texture
Available when Vertex Colour Based On is Albedo Texture Per Face or Albedo Texture Per Vertex. Choose a texture in your project and the colours will be applied according to the description under Vertex Colour Based On. This should be a texture asset in your project which has been imported with “Read/Write Enabled” enabled. You can disable “Generate Mip Maps” if you are not using this texture for other purposes, to save some file size. The Albedo Texture can be any size. It will be stretched to fit the Source Texture before the effect is applied.

Albedo Transparency To
Available when Vertex Colour Based On is Albedo Texture Per Face or Albedo Texture Per Vertex. Areas of the output that correspond to transparent areas in the Albedo Texture will be this colour.

Palette Asset
Available when Voxel Source is Data File and Vertex Colour Based On is any option that includes Palette. This is the palette asset containing the colours you want to use for this voxelization. You can easily change the colouring of your output using a different palette, as well as use your favourite palettes with different data files.
Palette Strength
Available when Voxel Source is Data File and Vertex Colour Based On is any option that includes Plus Palette. This is the strength from 0 to 1 with which you want the palette colours to be blended in to the positional colour. At 0.5, each colour would have equal strength.

Mesh Materials
These are the materials you would like to apply as vertex colour to the output mesh(es). You need to supply 1 material per mesh or submesh in the Mesh Prefab. The materials should be in the list in the same order as the meshes are in the Mesh Prefab. All texture assets referenced by the materials need to be imported with the “Read / Write” option enabled.

Mesh Material Alpha Cutoff
Available when Voxel Source is Mesh and Vertex Colour Based On is Materials. Areas of the Mesh Materials textures where the transparency level (alpha) falls below this threshold will produce a default colour of grey in your output, which you can change with the Material Transparency To setting..

Material Transparency To
Available when Voxel Source is Mesh and Vertex Colour Based On is Materials. Areas of the Mesh Materials textures where the transparency level (alpha) is above the Alpha Cutoff, yet less than full, will be blended to this colour by their transparency amount. I.e., the colours will appear transparent over the Material Transparency To colour.

Colour by Face Direction
Sets the colour of vertices according to which direction the mesh face they are on is pointing. In a VOXORex-constructed mesh, faces do not share corner vertices. Therefore, a top face and side face of the same voxel can be entirely different colours with no bleed between them. This colour is applied on top of texture and gradient colours. If you have Face Direction and Shadow being applied, one will appear over the other. You can choose which with the Colour Priority setting.
Assign North / South / East / West / Top / Bottom
All faces in the chosen direction(s) will have a specified colour. VOXORex refers to the mesh faces as follows:
North = facing +Z when constructed.
South = facing -Z when constructed.
East = facing +X when constructed.
West = facing -X when constructed.
Top = facing +Y when constructed.
Bottom = facing -Y when constructed. If Voxel Source is Texture, this option is only visible when Bottom Mesh Type is not set to None.

Shadow Direction
This allows you to simulate a shadow or colour tint coming from a cardinal direction and affecting your output. See above for explanation of face directions. This colour is applied on top of texture and gradient colours. If you have Face Direction and Shadow being applied, one will appear over the other. You can choose which with the Colour Priority setting.

Shadow Colour
If Shadow Direction is not set to None, this colour will be blended into your output’s colours after other settings have been applied.

Shadow Height / Width / Depth
If Shadow Direction is not None, this proportion of your output by Width, Depth, or Height will be affected by the Shadow Colour, with full strength at the outer limit of the output and decreasing to none at the chosen width or depth.

Bottom Mesh Type
Available when Voxel Source is Texture. You can use the Bottom Mesh Type options to add a Flat mesh, a Vertical Mirror mesh, or None at all. Any bottom topology is combined into a tile’s mesh, not put on a second mesh. This is how it should be, but do note that by using these options you will be increasing the amount of vertices required for your design by up to 2x.
Flat bottom meshes will present a smooth solid plane of faces on the bottom of the mesh, which have the same colour as the faces above.
Vertical Mirror will mirror the mesh topology across the XZ plane, resulting in a mirrored (not simply flipped) version of the mesh extruding from 0 Y into -Y. By using Vertical Mirror, you can create some truly impressive 3D meshes and game-usable assets.

Mesh World Size Y
Available when Voxel Source is Texture. This is the final height in the Y axis to which your output will be set at scale = 1. If Vertical Mirror is used, this applies in both directions, therefore the size is doubled. This doesn’t affect the number of vertices or mesh topology, it is simply a default scale.
Mesh World Size
Available when Voxel Source is Data File or Mesh. This is the final desired size of the output in world units. This size will be applied to the largest dimension of the output (X / Y / Z) and others set proportionally. This doesn’t affect the number of vertices or mesh topology, it is simply a default scale.
Pivot Location
This is where you want the pivot of each mesh. The pivot is where the mesh's rotational center is, and also the part of the mesh that will be physically at the coordinates specified by its position. Pivots are indicated by the tool handle in the Scene view.
Center causes the pivot of each output mesh to be set the center of its bounds.
Common means all output meshes' pivots will be at the lower left front corner of the shared bounds of all the meshes as constructed. This option lets you later restore the relative positions of the sections more easily by placing them all at the same position.
Left Bottom Front causes the pivot to be set to that location on each individual mesh.

Add Mesh Collider
By default, output meshes will not have a Collider. You can tick the Add Mesh Collider option to give each mesh a MeshCollider. This can be useful for in game run-time generation.
Display Material
You can select a Material that will be applied to all the Mesh Renderer components in your output. If you leave this blank, VOXORex will assign an appropriate material, depending on your project’s active Rendering Pipeline, from those included. You can assign your own materials that support vertex colour, and they will work. Each individual voxel face is also UV mapped to display a texture, if the material uses any.
Mesh Name
Your output will consist of one or more meshes. Each mesh’s name can be specified by you and automatically appended with a tile number by VOXORex. You can leave the Mesh Name blank to have VOXORex assign a unique hashcode name based on the time the script was enabled in Play mode.
Run Optimizer
VOXORex has an option to automatically run the Mesh Optimizer after it is done generating each output mesh. Future plans are to include optimization as part of the generation process, but for now this is how it could be done. Since optimization can take more time than generation in some cases, this option is off by default.
Wall Cube
This feature is available when Voxel Source is Texture. This special feature of VOXORex allows you to produce infinite variations of game-ready, overall cube shaped walls with differently coloured and detailed voxel surfaces - think rock walls, brick walls, ice walls, spaceship corridor walls, modern interior walls, any type of surface you want to present as a wall! And all it takes is a minute of selecting your image(s) and tuning your settings.
When Texture Mode is Tiles, choosing Wall Cube requires a single tile of any size. When Texture Mode is Free Size, choosing Wall Cube requires your Output Width and Output Depth to be equal. These minor restrictions are because that piece will be made into 4 copies and used as the side faces of a cube. You can use Bottom Mesh options on your wall’s base mesh, subject to common sense - if the interior will never be seen, don’t waste the vertex count! On the other hand, you can make a tunnel section, hallway or entrance way using a bottom mesh with Wall Cube (see provided Example Presets). Wall Cubes are made at a default size of 4x4x4 world units at scale 1.
The Wall Cube will be combined into a single mesh, with potentially another quad, so if you are running VOXORex in a version of Unity prior to 2017.3, be aware that your tile should have no more than 16380-16384 vertices to get a successful result. For game assets where performance matters, you should probably stick to no more than 4 Vertical Tiers, and Tile Size 64 (those are at most!), to keep the resulting combined mesh around 12k - 20k vertices. If your game is rendering only visible surfaces, that’s quite reasonable per wall side (3k - 5k; about the same as a nice tree model; and you can go even lower on the settings).

Wall Top Quad
Available when Voxel Source is Texture and Wall Cube is selected. Your Wall Cube can have a solid top face by enabling Wall Top Quad. It has a separate material slot from the rest of the wall. No colour will be set on the Wall Top Quad’s vertices unless you set Shadow Direction to North, in which case it will have the shadow colour at full strength. Two of the walls in the above example are shown using the Top Quad option using a shadow colour.
Wall Top Material
Available when Wall Cube and Wall Top Quad are selected. You can assign a material here to have it automatically displayed on your output’s Wall Top Quad. If you leave this blank, VOXORex will assign an appropriate material, depending on your project’s active Rendering Pipeline, from those included. You can assign your own materials that support vertex colour, and they will work. The Wall Top Quad’s face is also UV mapped to display textures, if the material uses any.

Log To Console
By default, information about each mesh produced will be written to the Console. You can untick the Log To Console option to suppress this behaviour. This can be useful for in-game runtime generation.
Select In Hierarchy
By default, the parent GameObject of the output meshes will be automatically selected in the Unity Editor Hierarchy window. You can untick the Select In Hierarchy option to suppress this behaviour. This can be useful for in-game runtime generation.
Position Camera On Finished
By default, VOXORex will attempt to position the main camera, if any, so that the output can be seen in entirety. You can untick the Position Camera On Finished option to suppress this behaviour. This can be useful for in-game runtime generation.
Show Progress Bars
If selected, VOXORex will show progress bars during operation. Could be desirable to turn off for runtime usage.
Run Time Generation: Use VOXORex Scripts in Your Game or App
VOXORex can be included in your scenes and activated at the right time (controlled by you) to create your game world models from textures.
Suppress reporting and convenience options: turn off Log To Console, Select In Hierarchy, and Position Camera On Finished.
If you want a Mesh Collider on the output, turn on the Add Mesh Collider option.
Have the VOXORex script disabled in your scene or prefab.
Add to your script: using ABCodeworld.VOXORex;
Assuming you have a reference to your VOXORex component as MyVox, add a listener to the GenerationComplete event: MyVox.GenerationComplete += MyHandlerMethod;
Your listener should have a single parameter of type GameObject. This is the parent of all meshes that MyVox will output when enabled.
After this you can enable the component (MyVox.enabled = true;)
VOXORex script can be on a static GameObject and still works.
VOXORex will produce output every time it becomes enabled. It doesn’t destroy previous output.
For meshes and data files, the output is created centered on 0, 0, 0 world space. You can move them. If your output has multiple meshes take care to move the parent object to move all meshes at once.
For textures, the lower front left bounds of the output are at 0, 0, 0 world space, and the tiles are laid out in relative position to that.
Saving and Using Your Output
I suggest you make prefabs out of the settings you like, so you can re-generate or modify them at any time.
VOXORex does not automatically save meshes for you, but you can do that if you are satisfied with your output! VOXORex includes one way to accomplish that - the freely available MeshSaverEditor.cs script. It allows you to right-click any Mesh Filter component on a Game Object in the Hierarchy and save the mesh as a Unity mesh .asset file. Also, Unity provides at least two more ways to save meshes from the Hierarchy. The glTFast package (Git URL: com.unity.cloud.gltfast) allows you to right-click any Mesh Filter component on a Game Object in the Hierarchy and save the mesh as a binary .glb or text .glt file. The FBX Exporter package, available in Package Manager (and via Git URL: com.unity.formats.fbx), does the same for .fbx files. Both of these formats can be imported into most other content creation software, such as Blender (Blender tip: to see the vertex colours, you have to assign a Colour Attribute to the object’s material’s Albedo, and be in Material Preview or Rendered mode). PS - make sure you export the vertex colour!
Regarding preserving the relative positioning of multiple output tiles, all you need to do is drag the parent object of the tiles, in Play mode, to the Project window to create a prefab. The prefab will have everything saved except the meshes assigned in the Mesh Filters, because the meshes existed only in memory when the prefab was created, not as a referenceable object. You can restore the Mesh Filters’ assigned meshes at any time once the meshes are saved by dragging them from the Project window.
Tip
You can use different-sized and proportioned images for Source Texture, Shape Texture, and Albedo Texture. They will be mapped to the same space before operations are applied. The Gradient Texture is a special case, please see that section in Settings Descriptions.
VOXORex Data File Format
VOXORex Data Files should be formatted according to the following rules. In summary, it is a series of horizontal slices of your model from bottom to top, each character representing a voxel and each space representing empty space. If you provide a palette, the character used also specifies the colour of the voxel. For examples see the files in the VOXORex\Examples\Data Files folder.
File Name: Not important. Anything allowed by your system. Does not need a file type ending (such as .txt), but you can put one if you want.
File Contents: Printable ASCII text characters. Encoding doesn’t matter as long as it can be read as text. ANSI, UTF-8, Unicode, sure.
Line Endings: ASCII Carriage Return and Line Feed (characters 10 and 13). Press Enter to make this happen.
Line 1: Any text. The examples currently show how I would use it to identify what the file is. Another useful thing on line 1 could be the name of what the object is, but it’s up to you. It is your space to record any information you want along with the file.
Line 2: Three whole numbers separated from each other by a space. The first number is the number of voxels you are providing per slice in Width, the X dimension in your output. This will be the number of characters per line in your file. The second number is the number of slices you are providing, which become vertical tiers stacked on one another. This is the Height, the Y dimension of your output. The third number is the number of voxels you are providing per slice in Depth, the Z dimension in your output. This will be the number of lines it takes to represent one full slice. You can have only 1 slice if desired.
Example: 3 1 3 means 1 slice that is 3 lines of 3 characters each.
Example: 13 45 20 means 45 slices that are 20 lines of 13 characters each. So VOXORex would expect the lines of data in this file to be 45 slices x 20 lines = 900 lines, starting after line 2.
Line 3+: Each of these lines should either be a blank line or a line of data. You can use blank lines when hand editing to help you tell when one slice ends and the next begins. Blank lines are skipped by VOXORex when reading the file. A line of data must contain the number of characters specified as the first number on Line 2. If it is all empty space, you must enter all the space characters.
Each character that is a space will not produce a voxel. Each character that is not a space will produce a voxel. The character you use can be any printable ASCII character. If you want to control the colour of the voxels, use specific characters along with a palette (see VOXORex Palette).
If you are getting Index Out of Range errors, most likely the provided text does not match the size specified on line 2.
End of File: After VOXORex reads the final character that it expects to find based on the size given on Line 2, it ceases to process any more data, therefore the rest of the file contents are irrelevant.
VOXORex Palette
VOXORex Palettes are Scriptable Objects that you can create in the asset creation menus in Unity. They are a list of character-to-colour relations so that VOXORex can apply those colours to specific voxels generated from the file. Simply increase the array size to what you want (keep in mind there are less than 256 printable ASCII characters), and enter your characters and colours. Then assign the palette to the Palette Asset parameter in a VOXORex script.
VOXORex File Maker
VOXORex includes a utility, the VOXORex File Maker, that can take any texture as input and produce a VOXORex Data File. It can capture the shape of a texture based on an alpha cutoff. It does not capture any colour information at present, but that is a planned feature. You can use the VOXORex File Maker to create a one-voxel high design or an entire 3D model at once by using an input texture that is a a series of slices (or imagine what would happen if you used animation frames). VOXORex File Maker uses ASCII character 178 for all voxels, which looks like: ▓.
To use VOXORex File Maker, add the script component to a GameObject in the hierarchy. Set the options below, then click the Convert button. You can then voxelize from that file with VOXORex.
Source Texture
This should be a texture asset in your project which has been imported with “Read/Write Enabled” enabled. If you have a texture with transparency and want VOXORex to use that, you must also import with the “Alpha Is Transparency” option ticked. You can disable “Generate Mip Maps” if you are not using this texture for other purposes, to save some file size.
VOXORex File Maker will perform a 1 pixel to 1 character conversion on the texture, which ends up as 1 voxel when voxelized by VOXORex.
Alpha Cutoff (File Maker)
Areas of the Source Texture where the transparency level (alpha) falls below this threshold will produce space characters in your output data file.
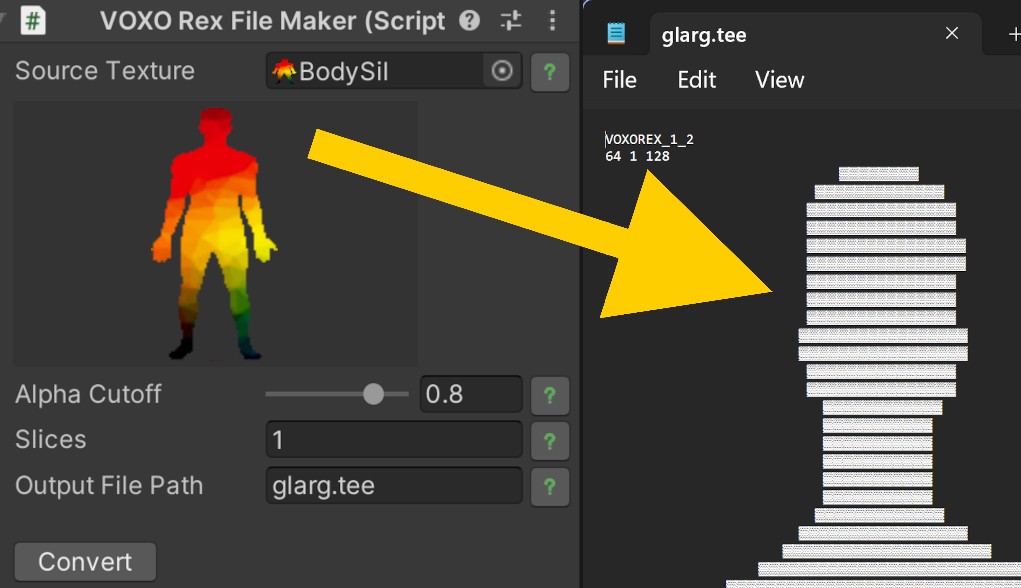
Slices
This is the number of slices represented in your texture. You can specify more than 1 to have the conversion process indicate in the data file that the texture should be voxelized as that many slices. You can also easily change that number by editing the text file.

Output File Path
This is the project-relative path under Assets where the output data file will be produced.
Mesh Voxelization Tips & Info
It should be possible to generate a very accurate voxel version of just about any mesh or set of meshes with VOXORex, but as it is a nascent feature and not fully robust, here are some tips to help you get successful and usable results.
Don’t use meshes on SkinnedMeshRenderers for now, set up a new prefab with a MeshFilter pointing to the same mesh.
Import your mesh assets with the Use File Scale option enabled.
VOXORex cannot currently use embedded materials! Extract them however you like, or:
Select the embedded texture in the Project window. This loads it into the Preview window, which is normally docked in the bottom of the Inspector window.
If it is docked, undock it by right-clicking on the title bar of the Preview window.
Size the window so it is at least as large as the resolution of the texture you want to create.
Screen copy the window and paste it into your favourite image editor.
Crop out everything but the texture, rescale to your desired size (e.g. 1024x1024) and save as a new image.
Import that image to your Unity project (enable Read / Write! disable Mip Maps) and set up a Material using it.
VOXORex can handle sub-meshes. Each sub-mesh results in a separate output mesh (or split mesh group if using UInt16 and vertices over 64k). You can position, scale, and join them as you like using other tools, or you can write a script, because for now VOXORex does not do these for you, just makes you the voxel meshes.
You can use a prefab or GameObject with multiple meshes in its sub-hierarchy, and VOXORex will voxelize them all. Each one results in a separate mesh or group. The scale you specify in Source Upscale will be used to scale each mesh. Keep in mind the scale at construction is merely a default and you can have it any size you want using the transform scale.
VOXORex handles many types of meshes with no problem, but if you get garbled results, your best bet is to go one mesh per voxelization, prepare your source as a single mesh with no submeshes, that is centered on its pivot and has no more vertices / triangles than you need. Retopologize lower if you still have issues.
VOXORex Mesh Utils (Mesh Optimizer)
VOXORex Mesh Utils is an additional script included with VOXORex that currently includes one function - a Mesh Optimizer that optimizes meshes made with VOXORex. It will produce a new optimized mesh with all co-planar, adjacent, same colour areas merged into as few triangles as it can. This makes the mesh more efficient to render. More functions may or may not be coming to the Utils.
To use the mesh optimizer, find the VOXORex Mesh Utils script in the /Assets/VOXORex/Scripts folder or use the Add Component menu to add one to a GameObject in your scene. Then configure the settings described below, and click the Optimize button at the bottom of the Inspector window. The mesh optimizer does not require Play mode to work. The mesh optimizer does not alter the original mesh, it produces an optimized version that you can save by right-clicking on the Mesh Filter component of the resulting GameObject, through the convenience afforded by the MeshSaverEditor script which is also included with VOXORex.
Progress bars will be shown, but during the multi-threaded processing part they will not update. This is an initial limitation in order to maintain thread safety in versions of Unity that do not support the Progress class. Progress bars that work in background threads will be implemented in an upcoming release, for versions of Unity that support it.
Source Mesh
This is the mesh you want to optimize. It should be a VOXORex-produced mesh asset in your project. The optimization algorithm does not apply to (most) other meshes!
Basic Optimization
If selected, the resulting mesh will have all co-planar, adjacent, same colour areas merged into as few triangles as it can. You can choose not to do this, and still use the Posterize Colours, Eliminate Faces, or Rotate options.

Posterize Colours
If selected, you can specify the number of distinct levels per colour channel (red, green, and blue) that will be used to make up the colours of the optimized mesh. Less colours means less triangles on the result. Adds a small amount of time to the optimization process.

Colours Per Channel
This is the number of distinct levels per colour channel (red, green, and blue) that will be used to make up the colours of the optimized mesh. E.g., if the slider is set at 4, the optimizer will use 4 shades of red, 4 shades of blue, and 4 shades of green to approximate the original colours as best it can. This results in a lot less triangles on the resulting mesh (if Basic Optimization is used) because many areas that are subtly different will be merged into one. The less Colours Per Channel, the less colours are available, so merged areas will be larger and the appearance less faithful to the original. In most cases if you are going for low triangle count you will also want to posterize because it makes a big difference in optimization.
Eliminate Faces
You can select any or all of the six cardinal directions to not include faces pointing in that direction during the optimization process. The resulting mesh will not have any of the selected faces. This is a very useful optimization choice for meshes that are never seen from a certain angle.
Rotate By
You can apply a rotation to the underlying mesh data, causing its default orientation to change. Specified degrees will be added to the existing rotation. This is useful if the mesh in its default state is not pointing the way you need it to.
Show Result
If selected, the optimized mesh will be shown on a new child of this GameObject. Turn off for run time usage in apps & games.
Display Material
If Show Result is selected, you can select a Material that will be applied to the Mesh Renderer component of the resulting mesh. If you leave this blank, VOXORex will assign an appropriate material, depending on your project’s active Rendering Pipeline, from those included. You can assign your own materials that support vertex colour, and they will work. Each individual voxel face is also UV mapped to display a texture, if the material uses any.
Show Progress Bars
If selected, the Mesh Optimizer will show progress bars during operation. Could be desirable to turn off for runtime usage.
VOXORex Colour Effects
VOXORex Colour Effects is an additional script included with VOXORex that you can attach to any VOXORex-produced mesh and animate the vertex colours in various ways. It also works on most non-VOXORex meshes. To use it, find the VOXORex Colour Effects script in the /Assets/VOXORex/Scripts folder or use the Add Component menu to add one to a GameObject in your scene. Then configure the settings described below, and the effects will be active any time during Play mode.
Target Mesh
This should be a mesh in your scene whose colours you want to animate.
Vertex Selection
You can specify whether you want to apply the colour effects to All vertices in the Target Mesh, or restrict it to a range defined by the following options:
By Original Facing: Include only vertices comprising faces that point in the specified direction, based on the mesh's unaltered rotation. Depends on the mesh normals to determine this. On VOXORex meshes, faces only point in these directions.
By Palette: Include only vertices whose colour exactly matches any colour found in the specified Palette.
By Range Set: You can define a set of percentage-based or index-based ranges of vertices to apply the effects to.
Palette
Include only vertices whose colour exactly matches any colour found in the specified Palette. Works best when you have a mesh voxelized from a Data File using Palette colouring, then apply effects to that mesh using the same Palette. A VOXORex Palette is a Scriptable Object asset you can create via the Assets > Create menu.
Range Set
You can define a set of percentage-based or index-based ranges of vertices to apply the effects to. Index-based ranges begin at 0. Both types are based on the order of vertices found in the mesh. The Range Set can be 1 range or as many as you desire. A VOXORex Range Set is a Scriptable Object asset you can create via the Assets > Create menu.
Invert Selection
Apply the effects to the parts of the mesh that do not match the Vertex Selection, instead of parts that do match.
Concurrent Vertices
This is how many vertices to group together when applying one step of an effect. Works in varying ways with different Effects. Note that using a multiple of 4 on a VOXORex mesh will ensure groups don't split in the middle of a square. If this number exceeds the number of vertices in your mesh, the effect will halt.
Colour Effect
This is the type of colour effect you want to apply to the Target Mesh during run time.
Positional: Apply colour effects to vertices over time based on their position within the mesh.
Randomize: Randomize the colours of the selected vertices over time.
Sequential: Apply colour effects to vertices over time based on their order in the mesh data.
Positional Basis
This is the positional property to use when animating the colours.
Height: Cycle the colours gradually through the height of the mesh.
Width: Cycle the colours gradually through the width of the mesh.
Depth: Cycle the colours gradually through the depth of the mesh.
From Center: Cycle the colours gradually out from the center of the mesh bounds.
Reference Space
This is how to judge the position of a vertex - Local to the mesh, or based on World position. Choosing Local causes the effect to always stay relative to the mesh no matter its rotation in the world, and choosing World causes the effect to apply counter to any rotation of the mesh, with the result being that when the mesh rotates, the effect does not, but maintains its orientation in the world.
Colour Source
You can apply colours from a Gradient Key, Gradient Texture, or Albedo Texture.
Gradient Source
You can choose a built-in gradient colour key or a texture as the gradient source.
Gradient Key
Colour gradient to be applied to the mesh based on position.
Gradient Texture
Choose a texture in your project and the first column of pixels will be applied as a colour gradient, with the colour of pixel (0, 0) being the start of the gradient, pixel (0, 1) being the next, and so on.
Albedo Texture
You can specify any texture to have it projected onto the mesh vertices according to the selected options.
Blend Mode
You can choose whether the colour of the effect should Add to or Replace any original vertex colours.
Blend Strength
This is the visibility of the colour effect in relation to any original vertex colours.
Colour Speed
This is how fast to cycle the colour effect.
Direction
This is the direction of the effect cycle. You can have it continuously cycle in forward or reverse, or alternate between directions on every cycle.
VOXORex Range Set
VOXORex Range Sets are Scriptable Objects that you can create in the asset creation menus in Unity. They are a list of sections of a mesh defined either by percentage or vertex index. E.g. for a percentage-based range, to specify the middle 50%, set the Max at 75 and the Min at 25. To specify the first 10000 vertices of the mesh, add an index-based range with Max=10000 and Min=0. All ranges you add to the list will be included in the colour effect animation of the VOXORex Colour Effects script that is using the range set.
VOXORex Shader Info & Properties
VOXORex shaders can be used without configuration to display vertex colour, but they also support more features. There are Unlit and Lit, as well as Fade versions for each pipeline. Lit versions support being lit by lights, and casting and receiving shadows, which the Unlit versions do not. Fade versions support transparent textures and transparent vertex colours. It is recommended to use the Fade versions only when you need transparency, because drawing transparently costs extra performance. The properties can be set by creating a material that uses the shader, then adjusting the settings below from the Inspector window.
Vertex Colour Tint
You can add a tint to the existing vertex colours by changing this setting. Set it to white to have the vertex colours appear untinted.
Vertex Colour Strength
You can control how much of the vertex colour is visible by changing this setting.
Texture
You can display a texture on the mesh by selecting it here. If you use a transparent texture, use a Fade version of the shader.
Texture Tint
You can add a tint to the existing texture colour by changing this setting. Set it to white to have the texture colour appear untinted.
Texture Strength
You can control how much of the texture colour is visible by changing this setting.
Texture Emission
You can have the texture emit light by selecting this option. In earlier versions of Unity, this option may be displayed as a slider rather than a checkbox; set it to 1 for on, 0 for off.
Texture Emission Colour
This is the colour of the light you want to be emitted from the texture. Note that it is an HDR colour, therefore you can change the intensity as well as the colour of the light via the colour popup.
v1.4.1 Changes
New Feature: All Lit shaders now support a Normal Map.
New Feature: Lit URP & HDRP shaders now support Metallic and Smoothness properties.
Fixed: URP & HDRP shader property names were at default values, they have been changed to meaningful names.
Fixed: URP & HDRP shaders were intended to have tiling & offset properties provided, but they were not. Now they are.
Fixed: Eliminated possible build errors in projects using VOXORex at run time due to improper editor code isolation in VOXORexCommon.cs.
Fixed: Added missing logic in optimizer to handle VOXORex Vertical Mirror mesh peculiarities, which was resulting in left-right faces being flipped in the other direction on the lower half only on the optimized mesh.
Changed: Updated info in 00_license.txt.
v1.4 Changes
New Major Feature: VOXORex Mesh Utils script, having the Mesh Optimizer that can significantly reduce the number of triangles without changing the visual appearance of most VOXORex meshes.
New Major Feature: VOXORex Colour Effects run time script that animates the vertex colours of any mesh in various ways. Intended for use on VOXORex meshes, but works partially to fully on many others.
New: Shaders were renamed and got some basic features and a transparency-enabled version.
Changed: Corrected documentation about the minimum size of a texture that can be used for Gradient Texture. It was previously stated as 1x1, and it is now correctly stated as 1x2.
Fixed: There was a bug causing some Texture voxelizations with Vertical Mirror to have extra internal faces.
v1.3 Changes
Mesh voxelization can now capture material colours, in effect baking any texture to vertex colour in the voxelized mesh, according to the texture coordinates present on the original mesh. This is accomplished via a new option, Vertex Colour Based On: Materials.
Mesh source is now specified as a prefab rather than a Mesh asset.
Renamed the old “Mesh Material” setting to “Display Material” to avoid confusion with Mesh Materials list.
Fixed Source Upscale to hit the specified size even if the mesh’s natural scale is not 1. Set default from 1 to 48 because it should have not been left at 1 originally.
v1.2 Changes
New Major Feature: Voxelize any mesh.
New Major Feature: Voxelize from a simple proprietary ASCII data file with full control over each voxel’s position and colour.
New Major Feature: Voxelize textures in a new Free Size mode.
New: User experience has improved with the arrival of progress bars letting you know VOXORex is working.
New: HDRP and URP support has improved, with each getting its own example scene with better lighting and camera results.
New: Shadow can now be applied in Top and Bottom directions, for a full choice out of all 6 cardinal directions.
New: Shadow colour or Face Direction colour can be given priority if both are in use.
New: Pivot Location choice is now Center, Common, or Left Bottom Front.
Changed: Documentation updated and layout changed. No information has been lost, some may have been moved.
Changed: Inspector layout has been given some GUI love with a slimmer width that won’t force your Inspector to have horizontal scrollbars, better image sizing, and tooltip icons are now buttons that pop up the tooltip message when you click them, and they work in Play mode so you can access that information any time.
Changed: Tweaked Built In RP Example Scene environment and lighting for better contrast.
Changed: Normalize Height and Clamp Height are now allowed simultaneously. The more restrictive of the two limits on either end will be used.
Changed: Raised max limit of Vertical Tiers from 64 to 128.
Changed: Raised max limit of Mesh World Size Y from 64 to 10000.
Changed: Lowered min limit of Mesh World Size Y from 1 to 0.1.
Changed: If your output is a single mesh, there will not be a number appended to the name.
Changed: Mesh numbers now start at 1 instead of 0, and pad to 5 digits since there could be up to 16384 meshes.
Changed: In Wall mode, the final world space size of the mesh at scale 1.0 is now a 4 unit cube plus whatever voxels may protrude from wall surfaces based on your settings. Formerly it was left at full construction scale and simply scaled down via transform scaling.
Changed: Folders reorganized to accommodate the growing number and types of assets.
Changed: Moved some non-mesh Inspector settings from Mesh to a new category Operational, since they are that, along with the new option to suppress progress bars.
Changed: I have not encountered any problems with using the full allowed limit of vertices in UInt16 meshes, but in response to discovered information I have lowered the number the VOXORex will use (generally by 1 cube face). Triangles are also subject to the same limit, but FYI, VOXORex meshes always have exactly half as many triangles as vertices (1 cube face = 2 triangles = 4 vertices).
Changed: More precise tracking of actual + potential vertex count, allowing higher settings when using bottom mesh options on UInt16 meshes.
Changed: HDRP and URP shaders, materials, scenes, and supporting resources are now contained in their own packages included with the installation, and not imported by default. They are found in the \Assets\VOXORex folder.
Changed: Relocated 00_license.txt from the Textures folder to the main Examples folder and it now includes license usage information for all types of assets used in the package.
Changed: Texture updates and additions to support new examples.
Fixed: There was a quite embarrassing bug with Normalizing that was resulting in incorrect heights across multiple sections (sometimes). All smooth now and the full range is being hit, so there is no thick bottom layer - the lowest voxel stacks when Normalizing should be 1 cube now, somewhere in your output.
Fixed: There was a problem with outputs with inverted height not getting the full range of gradient colour applied. Now they do.
Fixed: When using the Vertical Mirror option, only half the actual vertex and triangle count was being reported. Now it has the full number.
Fixed: Eliminated more compiler warnings in some versions of Unity for RenderingPipelineDefines.cs. It may finally be OK until the next deprecation.
v1.1 Changes
Namespaces updated to allow more sensible script usage.
GenerationComplete event will now be invoked when the output is complete.
VOXORex now starts in OnEnable rather than Awake.
Added new options to improve runtime usage: Add Mesh Collider, Log To Console, Select In Hierarchy, Position Camera On Finished.
Fixed (harmless but annoying) compiler warnings in RenderingPipelineDefines.cs.
Example scene and prefabs redone to work out of the box in all versions of Unity.